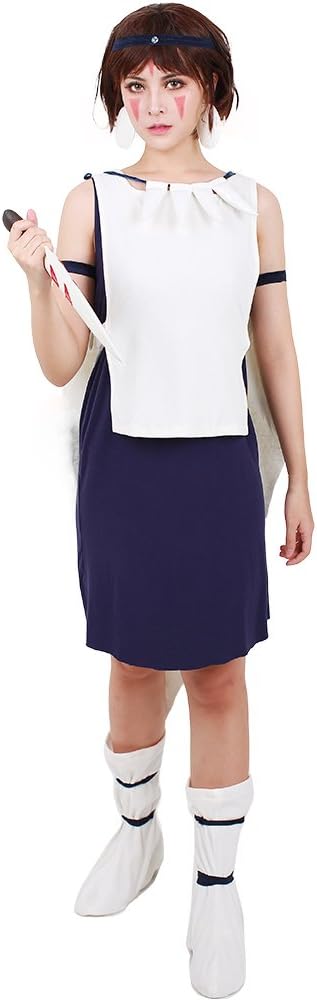
miccostumes Women's Anime Princess Cosplay Costume with Bands Earings and Boots Covers
FREE Shipping
miccostumes Women's Anime Princess Cosplay Costume with Bands Earings and Boots Covers
- Brand: Unbranded

Description
I recently started foamsmithing after an interview with Bill Doran of Punished Props, so I really wanted to do a cosplay with a full set of armor to practice what I’ve been learning. However, after my trip to DragonCon and seeing all the amazing San cosplay, I knew I had to do Ashitaka next. Also, because my son and I always do father-son cosplay, I figured I could easily make him a kodama with relative ease and be set. Apologies again for not having more intermediate steps but after I had the PVC shaped, I gave the entire thing a light sanding for better paint adherence, primed it, and then coated it with a matte spray paint that was the color I wanted. I then cut a strip of 2mm craft foam and glued it to the bow with Barge to make the grip. Once it was glued down, I hit it with the heat gun to give it a more worn leather look. Again, using the techniques I learned from Bill Doran’s prop-making book, I weathered the bow and grip to make it look a bit more realistic (this photo is from before I did the weathering). I then coated the whole thing with a matte clear coat to help protect it from scuffs and dings. Okay, I’m not Robin Hood, but I was very happy when my arrow actually flew across the yard. I decided to go ahead and use my Dremel rotary tool with the cutting bit on it to rough cut the blade out of my board. Since I knew I’d be heavily sanding the edges to get the bevel anyway, it didn’t need to be perfect. I was actually pleasantly surprised by how nice an edge I was able to get with just my Dremel though. What a difference a belt sander makes. I suggest varnishing before the next step to protect the paint from scratches and scuffs. Originally, I used glossy varnish to seal in the mask (since glossy varnish was the only varnish I could find) but I hated how it made my mask look so unnatural and super shiny. I just applied a thin layer of paint over it and the mask was nice and matte again. :-) Ashitaka’s signature red pouch was one of the easiest parts of the costume. I apologize for not having any work-in-progress pictures but I essentially took a square of leftover fabric, hemmed all the edges into an octagon shape, made a couple of buttonholes to reinforce where the rope would feed through and hang, fed a length of red hemp rope through the holes, and then glued on a wooden bead. It was the perfect way to carry my driver’s license, a credit card, some cash, my cellphone, and my house keys while blending in perfectly with the cosplay.
Princess Mononoke Cosplay Costume - Etsy UK
For anyone who doesn’t know, Princess Mononoke is one of my favorite films, so it was a no brainer for me when deciding on my next cosplay that I’d try Ashitaka. Paper mache! You can use white glue for this, but since (to my utter dismay) I couldn't find any white glue in the Chinese stationery shops, I made my own glue recipe, which is 1 part flour to 4 parts water, with a dash of salt to prevent mold. Stir the mixture throughly (to prevent lumps) in a pot and boil it over the stove. Let it boil for 2-3 minutes and pour into an airtight container. You can keep this in the fridge for up to a week. I started with a white base layer to make it easier to paint over layer. This mask had about eight to nine layers of paper-mache. Let dry every two layers. I was impatient so I used a hairdryer to speed things up. So far, I had managed to make the hood and face mask, though I was still trying to figure out the best way to attach the face mask to the hood (for this photo it was just safety pinned on). I made sure everything was lined and nicely hemmed and seamed as well. I wanted everything to look like something real and that would last more than one convention. I’m totally going into the shoe business.I then wanted to give the sheath a real leather look instead of just painting directly onto the PVC. I took a sheet of my faux suede and made a big fold-over seam along one edge and a nice finished seam on the other edge. I also sewed a lip of faux sherpa fur to the top side to hold into the sheath to keep my sword from scuffing. I slid the big fold-over seam into the slit between the two edges of the PVC, which kept the fabric in place snugly. I then sprayed the PVC with spray adhesive and pulled the fabric taut around the entire PVC sheath. I cut a hunk of 6 mm foam to fit into the base of the sheath, which served two purposes–it held down the loose bottom edge of the fabric and provided a nice cushion for my sword tip inside the sheath. I then covered it and the bottom of the sheath with 2mm craft foam. I also coated the fabric in a layer of Elmer’s Paper Maché Art Paste. This gave the fabric a little extra stiffness and protection without modifying the look much. Kwik Seal and PlastiDip–two of a foamsmith’s best friends. To finish it off, I painted the cap with a nice orange/rust spray paint. Lastly, I sewed a couple of loops into a length of braided cotton rope and glued it down to the sheath. The sword fit perfectly and the sheath looked great while carrying my sword safely. I always feel a little bit like Darth Vader when I wear this. Knife/Spear: I made a cardboard knife prototype, covered it with paper mache and painted it, again following this method by the same author as the mask tutorial: http://www.otakucrafts.com/2012/09/princess-mononoke-san-cosplay-mask-and-knife-progress/ Tunic: I got a cheap white tank top, cut off the bottom and slit the sides up to the arm seams, so it would fall open like San's tunic but wouldn't fall apart (pictures can explain this better than I can)
Princess Mononoke Cosplay - Etsy
With the sword all assembled, I began the very repetitive and painstaking process of sanding and painting and sanding. To get wood to look like metal, you must get rid of even the tiniest bit of wood grain. I used Rust-oleum Filler Primer for all of my base coats. This stuff is like magic–you spray it on, and not only does it prime your piece, but it actually fills in small gaps. Once the paint was dry, I wet sanded it with 220 grit sandpaper. Wet sanding is the way to go, by the way–less mess and a better finish. Once it was dry from my sanding, I sprayed another coat and repeated the process about seven or eight times. Not only did this get rid of my wood grain and give it a nice finish, but it performed the same way for my 3D-printed hilt, making it look and feel completely smooth.
Are Ashitaka And San A Couple?
Much of the technique for the knife comes from Otaku Crafts, http://www.otakucrafts.com/2012/09/princess-mononoke-san-cosplay-mask-and-knife-progress/ Hood opening. While the hood worked fine, it was the first piece I made and after spending a lot more time with reference photos, I realized the hood opening wasn’t the right shape. I’ll need to fix that. Cut out a rough ear shape from card, cereal box card is fine. I used an old cake mix box. Leave a bit at the bottom for the base of the ear. Tighter leggings. Although I made elastic straps for the top of my leggings, my initial attempt at making straps for my ankles failed. I couldn’t make them tight enough to hold down the leggings but also big enough to get over my foot. I was trying to avoid using snaps or velcro or anything that would not be realistic for the character but it meant that my leggings would creep up a little throughout the day and look bunchy. I’ll definitely need to solve this before next time.
- Fruugo ID: 258392218-563234582
- EAN: 764486781913
-
Sold by: Fruugo